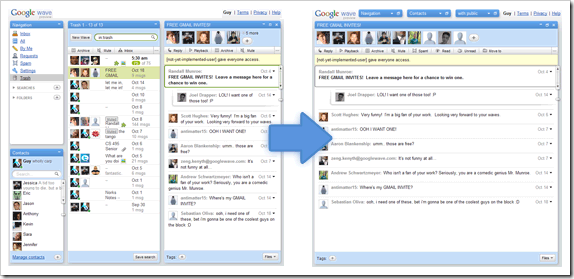
Google Wave is a notetaking fiend. Though so far it has been discussed primarily as a communications tool, it also has robust abilities as a personal information assistant. For instance, it’s the perfect place for me to store information about some upcoming travel, and collect links and information and ideas for projects I’m working on. The power to mix your medias — to put text alongside images, alongside documents, while all of it being instantly available on any machine with a modern browser, and instantly shareable with anyone else, is a huge breath of fresh air.
The drawback to using Google Wave rigorously as a note taking or personal information system is that your interaction with the documents themselves is similar to how you use emails in an email client – you must load Wave, find the relevant document, click it, then configure the editing pane to use the amount of space you want, etcetera. This is quite a bit different from the experience of simply having a notepad file on your desktop, for instance: in that case, you can jump in and out in a snap, because you have the actual file readily available.
The following will make your document editing a little less like an email client and a little more like you’ve got a media-rich notepad file within arm’s reach. Because it’s 2009, and you deserve it!
You’ll basically be creating a stripped-down view of any particular wave that will open inside a stripped-down layout of Chrome. Stripped-down-ness for the win.
It employs the power of Google Chrome’s “Create application shortcuts” feature, though the process would be similar if using any other browser-wrapper, such as Mozilla’s Prism; Chrome seemed the natural choice since it has a blazing fast JavaScript engine.
Making Your Standalone Document
- Install Chrome. This is kind of essential.
- Navigate to wave.google.com and open the wave you would like to act as if “converted” into a document.
- Now strip down the Wave interface so it’s the least distracting possible: minimize the Navigation, Contacts, and Inbox panes. (Aside: Since Wave encodes the position of these panes in the URL, you could create a bookmark right now, and every time you used that bookmark, it would bring back that saved panes-layout. Handy.)
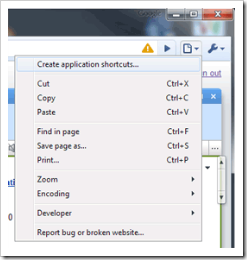
- Click the page icon in the top right of Chrome, then click Create application shortcuts.
- From the resulting dialogue, select for a shortcut to be created (at least) on the Desktop.
- Now for the hackish part. Right-click on your newly created icon on the Desktop, select Properties, and look at the Target field. It should currently end in ‑‑app=”https://wave.google.com/wave/”
- Replace everything after the ‑‑app= in Target with the full address of the desired wave, putting the URL in quotes. Make sure the end of Target now looks something like ‑‑app=”https://wave.google.com/wave/#restored:wave:googlewave.com!w%252BpPM3o3AFA.1”
- Click OK, and you’re done!
Now you can think of the shortcut you created just as you might a Word file, except for the fact that your document is actually in the cloud (and except for the fact that Word doesn’t do real-time collaboration, ahem). Do this for as many waves as you want, and don’t limit it to just personal notewaves! This technique is handy for keeping project notes with content from the web easily at hand, or keeping an important ongoing conversation nearby. Just think — you can have double-click access to any persistent chat conversation you want, with any number of people!
Google Wave Icon
Also, if you’re like me and you like pretty icons on your desktop (rather than the ugly stretched one that the application shortcut will have at first, at least in Windows 7), you can download the simple Google Wave icon I made and use it as the shortcut’s icon instead.
Download the Google Wave icon.

